Photoshop has a great arsenal of tools that let you work non-destructively. Let’s take a look at three of the most important options.
1. Layer & Vector Masks
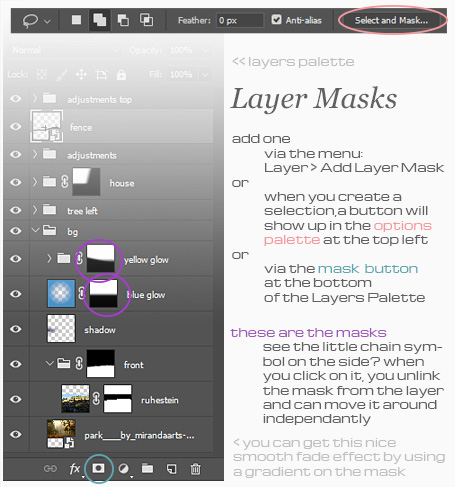
Have you ever cut something out using the earaser only to find out later (when your undos are no longer available) that you cut too much? Use Layer and Vector Masks instead of the eraser!
- A Layer Mask (Layer > Layer Mask > Add Layer Mask) is a raster mask that can go from white through grey to black: anything you paint black will become invisible, anything white is visible and all greys are degrees of opacity. You can use any brush to paint on it or you can use a gradient to get soft transitions. In addition, you can add a layer mask from an existing selection. Layer Masks can be refined using a special tool, too (double click on the mask thumbnail) to help you refine or soften edges.

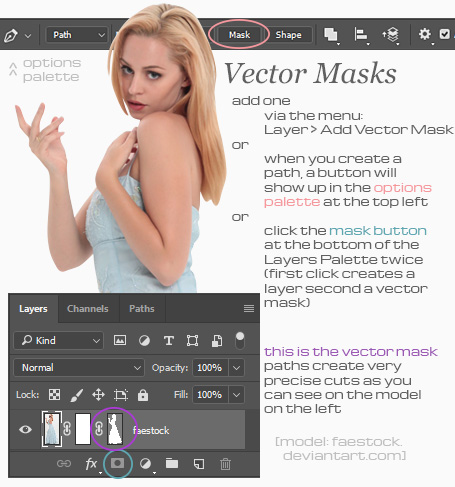
- A Vector Mask (Layer > Vector Mask > Add Vector Mask) is the vector equivalent to a layer mask. On it, you use vector paths to mask out what should be visible or invisble. You can create vector masks from existing paths, too.

2. Smart Objects
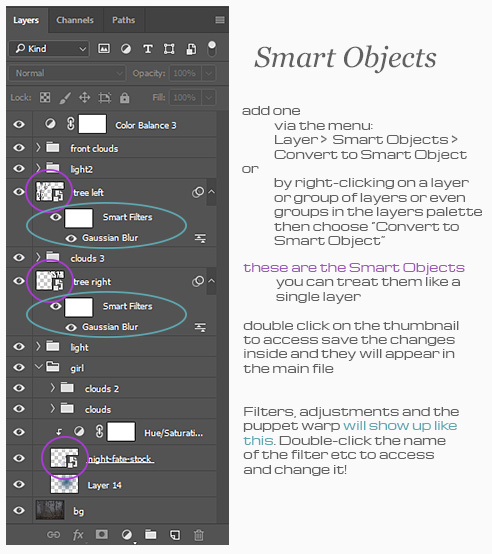
This is a great thing if you like to keep total control at all times (and don’t mind the large file sizes of the resulting psd). Basically, a Smart Object is a psd file within your actual psd. For example, you can create one from a number of layers (or groups of layers) and they will then behave as if they were one object. To create one, go to Layer > Smart Objects > Convert to Smart Object. To access its content you need to double-click on the layer’s thumbnail in the layer’s palette. Once inside, change what you like and save the file before exiting and the Object will update with your changes.
I use these for three main things:
- Unlimited resizing & easy access: Before I place a model on the canvas, I cut it out very roughly and just mask out most of what I don’t need with a simple layer mask (usually from a selection created with the quick mask tool). Then I create a Smart Object from it at full size. This way, I can scale it down and if I later find I need it bigger after all, I can scale it back up again without loss of quality. Also, I can start adding as many layers on top as I like. Once I know I will keep the model, I double click on the thumbnail to access the content and there I can cut it out precisely without any distractions on top (and at original size so I don’t need a microscope to go around all the tiny details).
- Smart transform / filter / adjust: If I need to make adjustments to the model (or any other smart object of course), for example pose her arms differently, I usually use the Puppet Warp Tool (Edit > Puppet Warp). It lets you put pins in all over the object so that when you move one of them, the rest will stay where it is. On a normal object, you need to undo this if you don’t like the outcome, but on a Smart Object, you can access the puppet warp (or any other transformation, adjustment or filter applied) at any time you like and change it. To do so, simply double-click the transformation (or filter) in the layer’s palette.
- Update multiple instances at once: If I have something I know I want to have multiple times in my image, for example lamps in a tree, I duplicate the original Smart Object and distribute the items where I want them to be. Then if I need to make an adjustment to the lamp (finalize cutting it out, adding colour corrections, etc), I access any one of the smart objects, change it, save it and voilá, all of them will update along! You just need to be careful about what you put inside the smart object since once you have it in the smart object, all will blend with the blend mode “normal” in your main image. That means that the glow for the lamp (set to Hard Light for example) will only blend on the lamp and outside it will look like it’s just a layer that does not blend properly, making the whole thing look seriously off. Therefore you need to do the glow on the main image and not inside the smart object!

3. Adjustment Layers
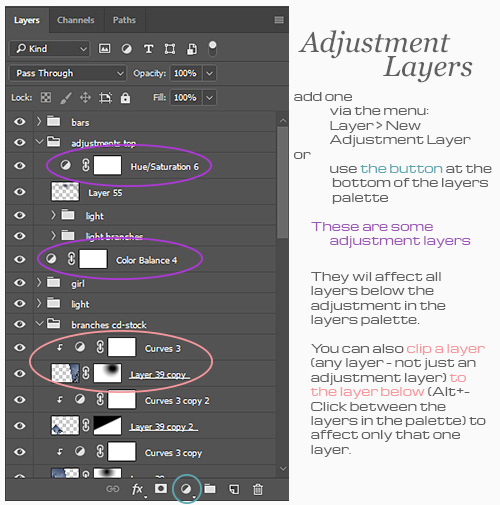
Adjustments are the things like Hue/Saturation, Color Balance, Levels or Curves that have the power to give your image the finishing touches or help blend individual layers into your composition. Now if you have a Smart Object, you can go to Image > Adjustments > *adjustment of choice* and it will be added as a “smart adjustment” that you can access like the puppet warp or the filters described above at any time to tweak the look. But what if you want to affect all layers or at least all below a certain level? In that case, you can use an Adjustment Layer (Layer > New Adjustment Layer > *adjustment of choice*) to add it to your layers palette. It also has a Layer Mask already attached that you can get creative with! Of course, you can also add a Vector Mask in addition.

Non-destructive editing is one of the greatest assets in Photoshop, so if you can incorporate some of the above in your workflow I feel that you have made a big step toward better images – since non-destructive editing means having the power to tweak everything at will without having to use the undo function.
I hope this little article helps you in your creative endeavours and I would love to hear your thoughts on it:
- Do you already use these features?
- If so, what are your favourites and what do you use them for?
- If not, what do you think will have the most impact on your work once you give the technique a try?
- Are there any more non-destructive editing techniques not mentioned here that you frequently use and would like to share?

PS: the layer palette screenshots in the above examples belong to the following artworks (click on the image to see the big version):
This blog entry was originally written for deviantArt‘s projecteducate Photomanip Weekend April 27/28 2018


Pingback: Video Tutorial: Adding Make-Up in Photoshop – kuschelirmel
Pingback: Photomanips for Beginners pt2 – Photomanipulation Software – kuschelirmel